
DISCLAIMER: THERE ARE AFFILIATE LINKS IN THIS POST. THIS MEANS THAT AT NO COST TO YOU, I WILL RECEIVE A SMALL COMMISSION IF YOU PURCHASE THROUGH MY LINK.
Last Updated on January 31, 2023 by John Patterson
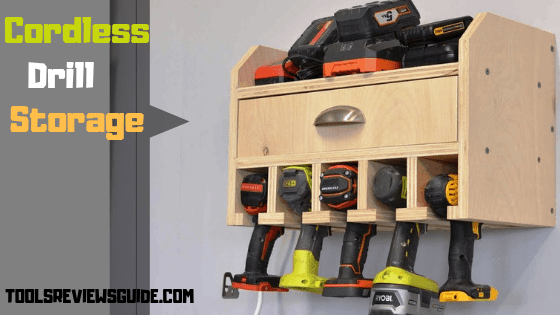
Building cordless drill storage with a charging station isn’t as hard as you think.
I know how bad it feels to keep the cordless drills unorganized and messed up.
I also understand that building a cordless drill organizer with a charging station may become a nightmare if you don’t know the procedure step by step.
To get you out of this messy condition and any doubt whatsoever, I’ve prepared this step-by-step cordless drill storage plan for making the storage.
After reading my guide, I’m sure you won’t look any further for any tutorial for building such an organizer.
So, what are you waiting for? Let’s get into the business.
First of all, let me tell you what the materials and tools you need to collect before starting the procedure are.

Table of Contents
Cordless Drill Storage Plans: Step-by-Step Guide
Materials & Tools That are Required for Building Storage
As I said, I am going to keep things simple. So, I will not list too many things here — just some necessary tools to get the job done.
Here are the materials that you need to make the charging station:
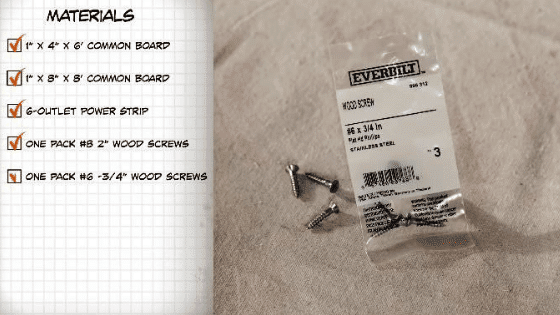
- One 6 foot 1×4 board (aka 1″x4″x6′)
- One 8 foot 1×8 board (aka 1″x8″x8′)
- One 6 outlet power strip.
- One pack of #8 2″ wood screws.
- Two packs of #6 ¾” wood screws.
Now here are the tools that you require for the charging station:
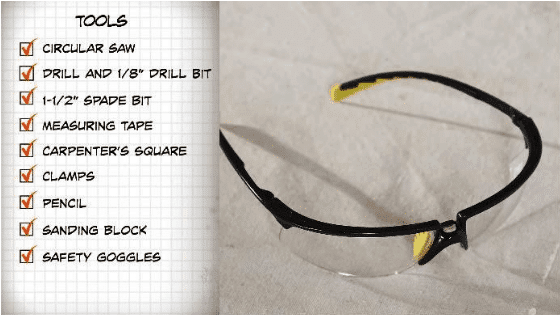
- Measuring tape.
- Safety goggles.
- Clamps.
- Pencil.
- Sanding block.
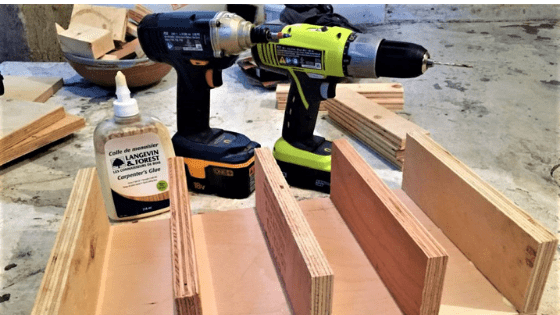
- Wood glue.
- Paintbrush and paint.
- Latex gloves.
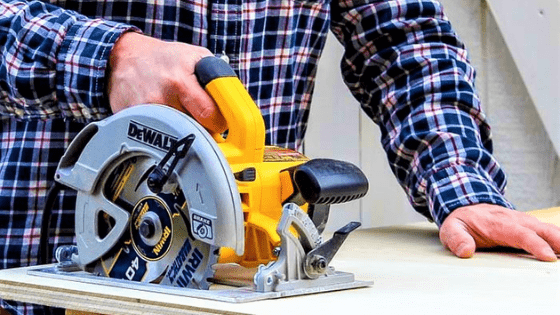
- One circular saw.
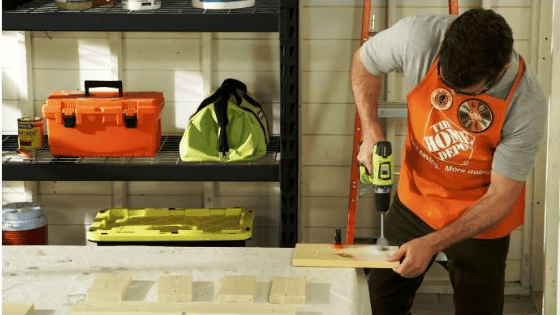
- A drill and ⅛” drill bit.
- One 1 ½” spade bit.
For the top-class drill, read our Dewalt and Ryobi cordless Drills Reviews.
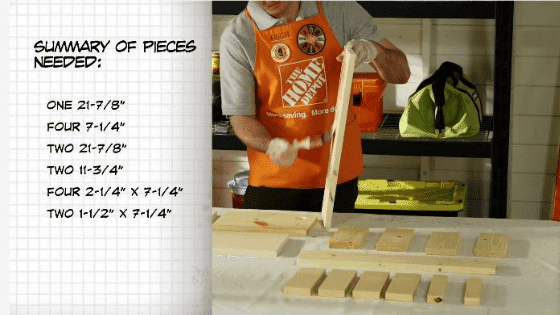
Cut List
So, here is a summary of the pieces you want to get after cutting the board.
| Quantity | Measurement (length) | From | Will be Used for |
|---|---|---|---|
| 1 | 21-⅞” | 1”x4” board | Backboard in step 10 |
| 4 | 7-¼” | 1”X4” board | T’ structure in step 7 |
| 2 | 21-⅞” | 1”x8” board | One piece to make the lower shelf in step 5, another one piece to make the top shelf in step 9 |
| 2 | 11-¾” | 1”x8” board | To attach the lower shelf in step 5 |
| 4 | 2-¼” | 1”x8” board | ‘T’ structure in step 7 |
| 2 | 1-½” | 1”x8” board | To make the outside bottom support in step 6 |
Making the storage: Step-by-step plans
Now I will write down the step-by-step plan for making the storage.
Step Number #1:

First and foremost, you must measure and mark the woods per our cut list plan.
So, get ready with your measuring tape, pencil, 6′ 1×4 board, and 8′ 1×8 board.
First, mark the 6′ 1×4 board with measuring tape and a pencil.
From this 1×4 board, measure 1 piece that is 21-⅞” long and 4 pieces that are each 7-¼” long.
From the 1×8 board, measure 2 pieces that are each 21-⅞” long, 2 pieces that are each 11-¾” long, 4 pieces that are each 2-¼” long, and finally, 2 pieces that are each 1-1⁄2″ long.
Step Number #2:

Once you are done with the measuring and marking, it’s time to cut the board into pieces according to the measurement.
Use your circular/table saw to straight-cut the board.
Now you’ve all the pieces ready to proceed to the next step.
Step Number #3:
Now let’s do some drilling.
First, let’s make a hole to route the power cords.
For this, take only one piece of 11-¾” board. Please note that you cut two pieces of 11-¾” from the 1×8 board. From those two pieces, take only one piece.
Next, using your spade bit, drill a 1-½” hole at the end of the 11-¾” board.
Step Number #4:
I will paint or stain all the wood pieces before assembling them.
Painting or staining is an optional step.
You can skip this step if you don’t want to paint or stain. However, if you’re going to paint, don’t forget to give all the pieces good sanding using the sanding block.
Once you are done with the sanding, paint or stain the wood pieces. Wear latex gloves while you are painting.
Step Number #5:

Now it’s time to attach the lower shelf.
To do so,
- Take one piece of 21-⅞” board that you cut from 1×8 boards.
- Take both the 11-¾” board that you cut from the 1×8 board.
Keep the 21-⅞” board in the middle. Then attach the 11-¾” boards at both ends of the 21-⅞” board about 3-½” from the bottom. Keep the hole side up. Here the hole side means the hole you just made in step 3 to route the power cord.
Attach the boards with wood screws.
Tip: Pre-drill the wood with the drill bit slightly smaller than the screws. This will prevent wood splitting.
Step Number #6:
Are you still with me? That’s great.
Next, we are going to attach the outside bottom support.
For this, take the two 1-½” pieces you cut from the 1×8 board.
Attach them to the bottom of the two sides of the lower shelf that you made in step 5. Make them flush to the edges. So, here you are attaching the 1-½” pieces to the 11-¾” boards that you used to make the lower shelf in step 5.
Attach and secure them with your wood screws through to the bottom of 11-¾” boards.
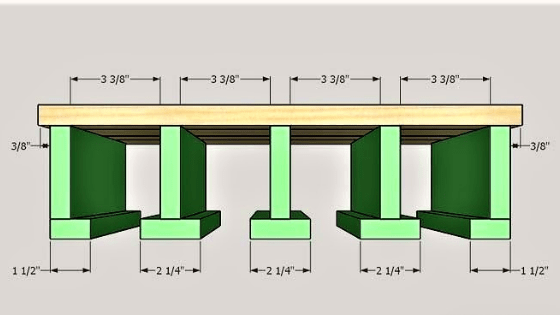
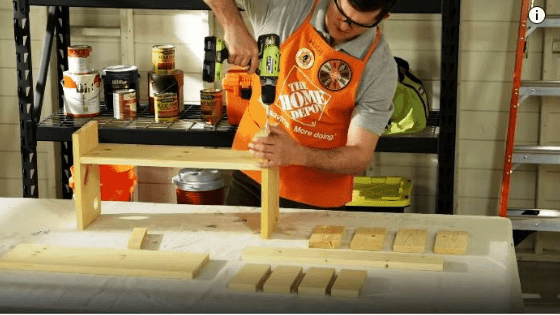
Step Number #7:

Now, we are going to build ‘T’ Support.
To do this,
Take one of your 2-¼” pieces that you cut from a 1×8 board. You cut a total of four pieces. Take one from them.
Then take one of your 7-¼” pieces that you cut from a 1×4 board. You cut a total of four pieces here too. Take one from them.
Attach the 2-¼” pieces along the bottom of the 7-¼” in the center to create a ‘T’ support.
Pre-drill and attach with wood screws.
Repeat this step 7 three more times to make a total of four ‘T’ support.
Step Number #8:
Then attach these four ‘ T’ supports to the bottom of the shelf, maintaining an equal gap.
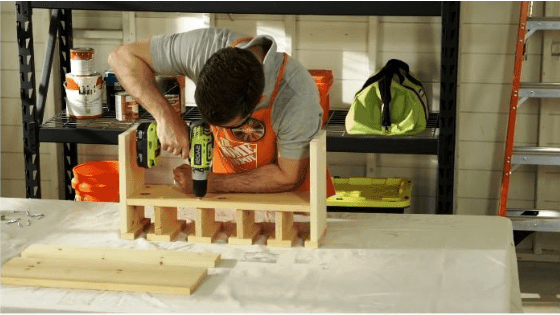
Step Number #9:

Let’s attach the top shelf in this step.
First, take the remaining 21-⅞” piece that you cut from the 1×8 board and then attach it from 2-½” down from the top of the frame.
Attach it with wood screws.
Step Number #10:

In this step, grab the 21-⅞” piece that you cut from 1×4 boards to make the backboard. Place it vertically on the top shelf at the edge of the backside. Secure it with wood screws.
Step Number #11:
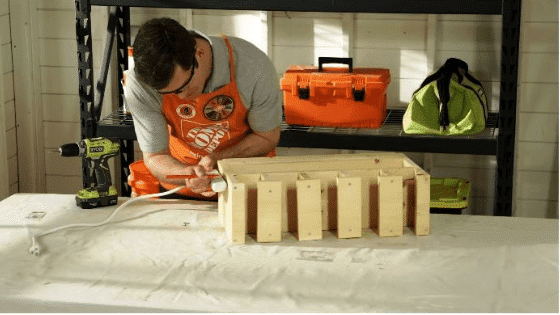
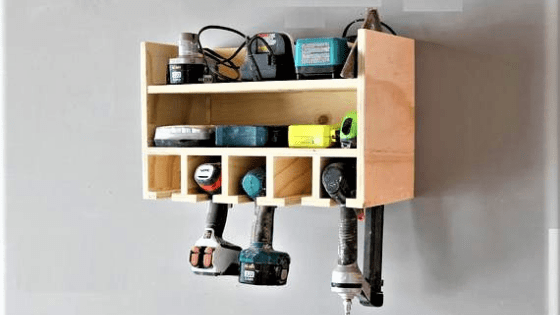
Now your cordless drill storage is ready.
For this last step, we will mount the power strip sidewise. Mount it to the side where you made the hole to route the power cord.
To mount the power strip, first, make two marks on the side piece of the shelf, maintaining the distance between the two mounting holes of the strip.
Then drill two #6 ¾” screws through each of the marks. Don’t drill the screw-down fully, as we will use them to hang the power strip.
Voila, you’re set.
Tool Storage video:
Final Words
Now it’s your turn!
Give yourself a break and start building your cordless drills storage with a charging station.
It shouldn’t take more than one and a half hours to complete all the steps (total 11 steps that I’ve written down here).
Do you have anything to ask regarding these steps?
Comment below!
Related Reading:
#1. Cordless Drill Makers
#2. Charging a cordless drill without a battery
#3. Cordless drill using ideas
#4. Difference between corded and cordless drills.